By Matt – Lead Coasteering Guide & Founder of Kernow Coasteering
I’m Matt, founder of Kernow Coasteering. I’ve guided thousands through Cornwall’s wildest sea caves and remote cliffscapes, and led countless exploratory coasteering missions along the Cornish coastline — and far beyond, from the sub-Arctic to the Indian Ocean. This gear guide is based on real-world experience and plenty of personal trial and error.
Self-Led Coasteering: What You Need to Know Before You Gear Up
More and more people are getting into independent coasteering to enjoy the thrill of authentic coastal exploration for themselves. Coasteering is rather unique in that, since the activity was first developed, it has almost entirely been carried out as a guided experience, with most participants enjoying it only a few times under professional supervision.
Opinions are divided on whether this is a good thing or not. But, opinions aside, it is happening, and if you’re reading this, you’re likely one of those people looking to get out there and spend more time coasteering. You’re going to need a fair amount of the right equipment to ensure you, and the people you go coasteering with, are safe and comfortable.
This guide will point you in the right direction. First and foremost, let me be clear: coasteering, like any adventurous activity, carries its own unique risks. This is not an article on whether you should go coasteering, or how to coasteer safely. But it’s important to state upfront that safe coasteering depends heavily on having appropriate equipment.
Compared to many adventure sports, the bare minimum of equipment isn’t too pricey. And like any activity, there is the possibility to accessorise infinitely. The order of suggested equipment will be, more in less, in the order of priority needed to ensure safety. As the list goes on, more equipment will be needed, as your objectives become more ambitious.
Affiliate Disclosure:
This article contains affiliate links. If you make a purchase through one of these links, I may earn a small commission — at no additional cost to you.
Coasteering Equipment – The Essentials
Coasteering, even as part of a guided session, relies on four essential pieces of equipment. Most of this will be lent to you if you join a guided trip. But if you’re planning to head into the water by yourselves, you’ll need to supply your own from the outset — and you’ll need to make sure you’ve got kit that’s genuinely fit for purpose.
To get started safely, you’ll need:
- A wetsuit
- A helmet
- A Buoyancy Aid
- Footwear
We’ll start by covering each of these core items in detail. After that, we’ll move on to the important accessories, thermal extras, and safety kit that become essential as you move into more ambitious self-led coasteering.
Choosing a Wetsuit for Coasteering
This article is written with the assumption that you are in the UK. If you are lucky enough to be coasteering somewhere more exotic, you may need to adjust this advice accordingly.
In the UK, we experience water temperatures ranging from 6-10°C in winter, and 15-20°C in the summer. Even in peak season, that’s colder than many people expect — and it’s why, for UK waters, you’re almost certainly going to want a winter-weight wetsuit. That’s usually a 5/4mm wetsuit, i.e., 5mm around the body, diminishing to 4mm for the limbs.
Some hardier types may attempt to get by in a summer-weight wetsuit. I don’t recommend it. Coasteering involves extended time in the water, climbing and swimming in exposed conditions. A typical 3/2mm wetsuit quickly becomes inadequate — especially on cloudy or breezy days, where you’ll chill rapidly.
At the very least, getting cold can rapidly take the fun out of being in the water. But remember that, in the worst-case scenario, being ‘underdressed’ in too thin a wetsuit could lead to you getting hypothermia. If you are coasteering somewhere remote this could easily lead to a very serious situation.
At Kernow Coasteering we strongly recommend C-Skins wetsuits. We have been using them for years. Their build-quality has remained excellent throughout this time. And if cared for correctly, they last for years. The Legend sits in that sweet spot of warmth, flexibility, and durability that’s ideal for UK coasteering through most of the year.

If you’re intending to go coasteering throughout the year, then you may need to consider some heavier armour against the winter cold.
Winter Coasteering: Heavier Armour
If you’re looking for a winter wetsuit, I’d personally recommend the C-Skins Rewired 6/5mm wetsuit. It’s a tank of a wetsuit, that still remains surprisingly flexible. You can read my full review of the C-Skins Rewired, or watch the video I made. Check it out to not only get the lowdown on the wetsuit, but also enjoy some January coasteering exploration at a beautiful spot in west Cornwall.
Coasteering in Warmer Waters
If you’re lucky enough to be coasteering in warmer waters, then lucky you! Depending on the water temperatures you’re experiencing, you may have want to change your wetsuit accordingly. If a 3mm wetsuit is all you need, then consider the C-Skins Legend 3mm.
While a 3mm wetsuit will still provide full-body protection against cuts and scrapes, it’s worth noting that 2–3mm neoprene is far less robust than 4–5mm neoprene. The thinner neoprene is much more prone to tearing if it snags on sharp barnacles, jagged rock edges, or metal debris. It doesn’t take much to cause a significant rip in a summer-weight suit if you catch it badly.

Coasteering Without a Wetsuit
Is coasteering without a wetsuit even a thing? In suitably warm waters, yes — it absolutely can be. That said, it’s important to recognise that a wetsuit isn’t just about warmth. It also provides critical protection from sharp rocks, barnacles, and other marine life — the kinds of hazards that are almost constant in the intertidal zone where coasteering takes place.
In fact, the widespread adoption of wetsuits in the UK may well have been instrumental in allowing coasteering to develop as a sport at all. Without the barrier of neoprene, early participants would have found themselves cut to ribbons on every session.
So bear this in mind if you’re coasteering in waters warm enough to not need a wetsuit. Without the layer of protection offered by a wetsuit, you are much more vulnerable to minor injuries from cuts and slices, at the very least. As a general observation, warmer waters tend to be home to a great number of spiny and spikey creatures that we may encounter, compared to colder climes.
That said — if you’re aware of the risks, confident in managing them, and the water truly is warm enough, there’s no denying the freedom of coasteering in just shorts and a t-shirt. I’ve personally enjoyed sessions like this while exploring Oman — including one particularly memorable day surrounded by flying fish. You can watch that adventure, along with many more, over on our videos page.

You Need a Helmet for Coasteering!
I can’t put that in any simpler terms. It is possibly the one piece of equipment that is most essential for safe coasteering. In the same way you might frown upon someone who was cycling without wearing a helmet, I hope you would feel the same about coasteering without one.
Helmets are relatively inexpensive, and it would only take a small wave or movement of water to unexpectedly knock you into a rock and it could be game over.
When choosing your helmet, you want to get one that has been certificated as passing the requirements for this kind of activity. As ever, coasteering is too niche to have helmets specifically designed and tested for the sport. Maybe the closest analogue is kayaking. The European Standard for a kayaking helmet is EN 1385.
To summarise briefly the properties a helmet needs to achieve EN 1385, it should fulfil the following criteria:
- Ensure adequate protection from impacts
- Possess the ability to float even when submerged
- Offer a comfortable and secure fit
- Absorb shocks from knocks and bumps effectively
- Utilize reliable fasteners to prevent movement or dropping off
- Be designed to not hinder your field of vision.
Entry-Level: The Nookie Bumper Helmet
My recommendation is the Bumper water sports helmet by Nookie. It’s a basic, but very capable helmet. Coming in two sizes (adult and junior), each size has a huge range of fit due to its adjustable head band. For the price, it’s a great helmet, and is the helmet we offer our guests here at Kernow Coasteering

However, the Bumper helmet does have its limitations. It is quite bulky and admittedly isn’t the most stylish looking helmet. Looks aside, it can rock out of place, impairing the field of vision somewhat. Finally, the material used for the chinstrap, whilst robust, can rub on the neck, particularly on those longer sessions. For most recreational coasteerers, these are minor trade-offs — but worth being aware of.
Mid-Level: Sea Kayaking & Whitewater Helmets
If you’re looking for a step up in both comfort and performance, helmets designed for whitewater kayaking are an excellent middle ground.
Compared to budget helmets, these generally offer:
- Lower profile shape
- Superior fit and retention systems
- More comfortable padding
- Less chance of movement or visual obstruction
- Longer-term durability
Models from brands such as Palm, NRS, Sweet Protection, and WRSI are all excellent choices depending on your head shape and budget.
A Quick Note on Climbing Helmets
Some people wonder whether a climbing helmet could double as a coasteering helmet. In most cases, the answer is no.
Many modern climbing helmets — especially foam-based models — are designed to absorb high-impact blows from falling objects, but they’re not designed for full submersion. Once repeatedly soaked, many climbing helmets absorb water and become heavy and unbalanced during swims or duck-diving under waves.
Additionally, their vent designs often allow water to flood and slosh inside the helmet — something they were never engineered to handle.
Simply put: climbing helmets aren’t built for the dynamic water environment you’ll encounter while coasteering. Stick to helmets designed for water sports.
Premium: Gath Surf Helmets
At the top end sits the Gath Surf Convertible helmet — my personal helmet of choice for exploratory and technical coasteering.
Gath helmets are:
- Extremely low profile
- Fully non-absorbent (they don’t take on water)
- Extremely secure in heavy conditions
- Lightweight and low-drag in surf
- Fully suitable for longer swims and dynamic water movement
One caution: while Gaths are fantastic once you’ve gained experience, they can be less forgiving for newer coasteerers who may not have perfected their movement and positioning around rock features. For pure safety margin, a more padded whitewater-style helmet may offer slightly more blunt impact protection in early stages.
Choosing a Buoyancy Aid for Coasteering
Another vital piece of your core coasteering kit will be your buoyancy aid, also known as a PFD (personal flotation device). A buoyancy aid carries out a number of secondary functions throughout your coasteering session.
For one, it helps reduce your entry speed on jumps. This allows you to safely jump into shallower water than would otherwise be possible, provided you’re applying proper technique. A buoyancy aid also allows you to harness wave motion for moving in and out of the water, assists your swimming, and helps conserve energy — allowing you to coasteer for longer sessions without tiring.
So, what’s the primary function? God forbid, but if you lose consciousness for any reason, a buoyancy aid is going to keep you on the surface, thus improving your chances of survival exponentially. The bottom line is, do not go coasteering without a buoyancy aid.
But above all else, the primary function of your buoyancy aid is simple:
It may save your life.
If you lose consciousness for any reason — whether through injury, exhaustion, or medical event — your buoyancy aid will keep you afloat, dramatically improving your survival chances until help arrives. The bottom line is simple:
Never Go Coasteering Without a Buoyancy Aid.
Entry-Level: Nookie NKE Centre Zip Buoyancy Aid
For most people starting out in self-led coasteering, a basic centre-zip buoyancy aid offers excellent safety, fit, and affordability. At Kernow Coasteering, we’ve used Nookie’s NKE buoyancy aids for many years, and they continue to perform well.
The NKE comes in four sizes (junior to XXL) and provides:
- Secure, well-distributed flotation
- Easy donning via front zip
- Wide adjustment range for body fit
- Long-term durability
![Nookie NKE Centre Zip Buoyancy Aid Canoe Dinghy Sailing Kayak SUP Paddle Boarding [XXL]](https://m.media-amazon.com/images/I/41D0w51ZHwL._SL160_.jpg)
We’ve been using these buoyancy aids for years, and we will continue to do so. They are low profile, well-fitting, and last for years.
Upgrading for Self-Led Coasteering: Low-Profile Buoyancy Aids
As you progress into more serious self-led coasteering, you may want to invest in a higher-spec buoyancy aid designed for more dynamic use.
Many coasteering guides (and cross-over paddlers) often bring their sea kayaking PFDs along — usually identified by a large, front-mounted pocket designed for easy gear access while sitting in a kayak. While these work well for kayaking, I find them a bit too bulky and front-heavy for coasteering, particularly when scrambling through narrow gaps or doing higher-level rock movements.
Thus, I prefer a more low-profile buoyancy aid. However, a key feature you may want to look for are front pockets. These for me are essential for carrying various bits of gear, particularly a torch or camera. You’ll find front pockets indispensable once you start wearing a PFD that has them.
A higher spec buoyancy aid will have more adjustments straps, allowing for better fit, as well as extra padding, i.e., around the shoulders, for improved comfort.

A Note on Certification
Whichever buoyancy aid you go for, make sure it is authentic and is CE EN 393 (12402-5). Yes, that last number is very important. If you get that wrong, you may acquire a flotation device that can actually hinder your movement, rather than be a helpful piece of equipment.
A Note on Certification
Whichever buoyancy aid you choose, make absolutely certain it meets the correct standard:
👉 CE EN 393 (ISO 12402-5)
Yes, that last number is very important. If you get that wrong, you may acquire a flotation device that can actually hinder your movement, rather than be a helpful piece of equipment.
Footwear for Coasteering
The final piece of your core essential equipment is footwear. The thought of navigating through the intertidal zone, with all its sharp rocks and fauna is unthinkable. Not to mention getting up and down the cliff path, whether it’s over rocky paths or spiky vegetation. Just no.
That said, this is actually the one item of gear where I don’t recommend any specialist product.
In my experience, salt water destroys footwear faster than almost any other piece of kit. I’ve seen expensive canyoning shoes fall apart surprisingly quickly when used regularly for coasteering. Even one well-known surf and kayaking brand’s dedicated “sea trainer” showed signs of failure after just a single session.
The simple solution? Trainers.
For coasteering, any decent pair of lace-up trainers will do perfectly. They provide:
- Adequate grip on wet rock
- Protection for your soles
- A secure fit that stays on during jumps and swimming
Once they start breaking down — soles peeling, uppers tearing, or toes poking through — simply retire them and replace with another cheap pair. There’s no need to spend serious money on technical footwear that won’t last any longer.
Do Not Wear Beach Shoes Coasteering!
Do not wear those cheap, flimsy shoes, variously known as sea /reef / beach shoes coasteering. I mean the ones that consist of a very thin sole with usually a thin neoprene upper. They are not appropriate for a number of reasons.
- The sole is not thick enough to provide any real protection.
- They are usually hard to get a snug fit, and are therefore at great risk of being lost when jumping, or in white water.
- In general, they are cheaply made, and can fall apart at a moment’s notice.
If you’re going to follow the rest of this guide and buy appropriate equipment, don’t cut corners with your footwear. After all, I’m not recommending you spend the earth on a pair of trainers. Any old pair of lace-up trainers will do.
Coasteering Over-Shorts
To the uninitiated, coasteerers look a little odd. Not least of all because on top of their wetsuit, they’re usually wearing a pair of shorts. Why is that? The answer is simple. A cheap pair of shorts is a sacrificial layer that protects your wetsuit from the ravages of the barnacles and other sharp things you constantly interact with when coasteering.
With the best will, and best coasteering skills, in the world, you’re not going to be able coasteer regularly without potentially scraping up the rear end of your wetsuit. Save yourself the grief of costly wetsuit repairs by simply wearing a pair of shorts over your wetsuit.
Literally any pair of shorts will do. You can get shorts with just about any pattern on these days. For example, I like dragonflies, and I also like the the milky way. Yep, it turns out my needs are catered for when it comes to finding a funky pair of shorts.
Don’t hide your light under a bushel: As we all look ridiculous anyway, it’s a great opportunity to don some outrageous shorts you might not be seen dead in at any other time!

In summary:
- You don’t need specialist over-shorts
- You do need some sort of shorts to protect your wetsuit
- The funkier the pattern, the better. Own it.
That covers the bare essentials needed for safe coasteering. This means you’re equipped to be part of a group of like-minded adventurers looking for some excellent coasteering exploration. However, there is also some essential group equipment that every expedition should have with them.

Coasteering Safety Equipment
Whenever you go out coasteering, at least one member of the group should be carrying a safety bag, containing a minimum amount of key safety equipment. Of course, someone in the group needs to know how to use this equipment. If necessary, contact your local coasteering provider to see if they can offer you some training to set you off on your independent coasteering adventures.
In addition, consider doing a first-aid course. A first-aid course will provide skills that you could use to save lives, not just when coasteering, but potentially anywhere. We use First Aid Cornwall Ltd, and highly recommend them.
There’s no denying that a full set of coasteering safety equipment comes at a cost. In some situations — for example, when coasteering close to shore near a lifeguarded beach — you may be able to operate safely with minimal safety gear. And in fact, I would strongly encourage any first independent coasteering ventures to take place in exactly this kind of controlled environment.
However, as soon as you start tackling more remote, exposed or ambitious routes, proper safety equipment becomes non-negotiable. If you’re part of a regular group interested in coasteering together, consider splitting the cost of these essential items between you.
Coasteering Safety Bag
A key piece of your group safety kit is the bag used to carry your emergency equipment. After years of trial and error with different products, I’ve landed firmly on one brand: Watershed.
This US company makes the only waterproof bags I truly trust. Built from extremely durable materials and using a unique zip-lock style closure system, they consistently outperform other dry bags — and they actually do what they claim. In my view, they’re one of the few products that genuinely deserve the term ‘waterproof’.

While Watershed bags aren’t cheap, they’re far cheaper than having to replace expensive safety gear that’s been ruined by a failed dry bag.
As you will have observed, the Duffel Dry Bag isn’t exactly a convenient design for taking coasteering. That’s OK, because unfortunately, one bag is never enough! Despite being the best I’ve found, I cannot say Watershed Dry Bags are 100% waterproof, 100% of the time. Occasionally, whether it’s user error or not, some water will get in through the closure.
And inevitably, it will only be a matter of time before any item you take coasteering will show signs of wear and tear from rocks and barnacles.
Because of this, we always double-bag:
The Watershed dry bag goes inside a rucksack, which serves both as additional protection and as a practical carrying system during the activity itself. The rucksack allows the safety kit to be carried comfortably during swims, scrambles, and traverses. Just be aware: always remove your rucksack before jumping — both to protect the bag and its contents, and to avoid the risk of injury if you land awkwardly with a loaded pack on your back.
Recommendations for a Coasteering Rucksack
I can offer two solutions for a coasteering rucksack, both of which I own.


Option 1 is the Overboard 20 litre waterproof rucksack. If you read the small print, this bag does not claim to be waterproof and its roll-top closure is no match for the seal offered by Watershed dry bags. But that’s OK —the rucksack is primarily a protective vessel for the bag inside. If it lets in a small amount of water, no harm will be done, so long as you’ve got a reliable dry bag inside.
If you want the best that money can buy, two Watershed dry bags in conjunction is the way to go. The Watershed Big Creek is the Ferrari of waterproof rucksacks. Offering genuine waterproof protection, it is also very comfortable to wear.
With a capacity of 21 litres when rolled, it’s just big enough to fit a well-stocked Watershed GoForth Duffel bag, ensuring there is no wasted space, or having to endure the unnecessary bulk of the Overboard rucksack.
Whether you go all in for the Watershed bag may be a tough choice. Bear in mind that even this Big Creek will succumb to the coasteering environment eventually. But even when it has a few small holes from barnacles in, it still remains just as effective at the Overboard rucksack for quite some time!
What You Need in Your Coasteering Safety Bag
There are many products and systems that one could carry in the safety bag, but they can be broken down into three key areas.
- Equipment for calling for help
- Equipment for keeping warm / hypothermia prevention
- Basic first aid equipment, as well as any personal medication.
Nothing, not even Watershed dry bags, are 100% waterproof all of the time. I therefore suggest a multi-layered approach. The first line of defence from water is your outer rucksack. The second layer of waterproofing will be your chosen safety bag. Finally, everything in the safety bag could and should be in an additional waterproof bag or container.
This may seem like overkill, but at the very least, it will ensure the longevity of your safety equipment. But worst-case scenario, it could prevent failure of a vital piece of equipment, when you need it most.
Calling for Help Coasteering
Calling for outside help during a coasteering expedition is the last thing anyone wants to do. But as an adventurous activity, even the most experienced coasteerer has to admit that it could happen to the best of us. If it did, you wouldn’t want to suddenly discover that your only means of calling for help was malfunctioning. Therefore, it is recommended to have several means of calling for help in your safety bag.
- Mobile Phone: If you are lucky enough to have signal, the most obvious choice for calling for help will be your mobile phone. As part of your multi-layered system, you may want to get a robust phone case to carry inside your safety bag.
- Signal Flares: As ordering explosives by post is not a great idea, go to your local chandlery, who should stock a decent range of rocket and smoke flares. Make sure you have a working knowledge of how they work, and do note that they do have an expiration date.
- VHF Radio: If you’re out of phone signal, you may want to carry a VHF radio. Remember that in the UK, use of a VHF radio requires a licence. ICOM are a solid brand with a good reputation in the marine industry. I recommend their M25 model, whihc has a water resistant IP7 rating. That still means you need to encase in several layers of waterproofing, just to be sure (ask me how I know!).
Equipment for Keeping Warm
If for any reason you can’t exit your coasteering route, or if a member of your party is injured and cannot be moved without external help, hypothermia is a serious consideration. Carrying just two lightweight items could make the difference between life and death.
At the very least, you should carry a simple plastic survival bag. This can be used both in and out of the water. In addition, if a number of people cannot be moved and need to wait it out, for any reason, a small group shelter will make that experience a lot more tolerable.


Take a First Aid Kit Coasteering

That covers everything you need to have in your saftey bag. But just remember, I recommend that every item you put in the safety bag has it’s own additional waterproof bag or container. If anyone in your group needs to carry any kind of medication, make sure to carry it on every expedition.
Throwline for Coasteering
Throwlines are certainly an essential piece of equipment for guiding a coasteering session. Even in small amounts of swell, inexperienced coasteerers often need a bit of handy throwline assistance.
You may decide that a throwline is a very worthwhile addition for your coasteering group too. Less experienced group members may get themselves into a bit of bother and a throwline is a very effective solution at giving people aid without putting yourself at risk.
They can be invaluable for body belays on shorter sections of scrambling, etc. Make sure you have had proper instruction, training, and practice at the various throwline techniques before you start using one in the field.
Many people use an integral belt from which the throwline unclips. I find these to be unnecessary faff. Just clip the throwline to your PFD with a climbing carabiner.


When a throwline may not be needed
That said, I rarely carry a throwline for my own exploratory or peer-level coasteering trips. When you’re coasteering with equals — people fully capable of managing their own movement and hazards — the throwline often becomes redundant weight. And realistically, if something goes wrong, it’s just as likely that the person carrying the throwline could end up needing assistance themselves.
For me, a throwline has its place when you’re effectively acting as a de facto guide for less experienced partners. Outside of that, I generally leave it behind — one less bulky item to swim, climb and scramble with.
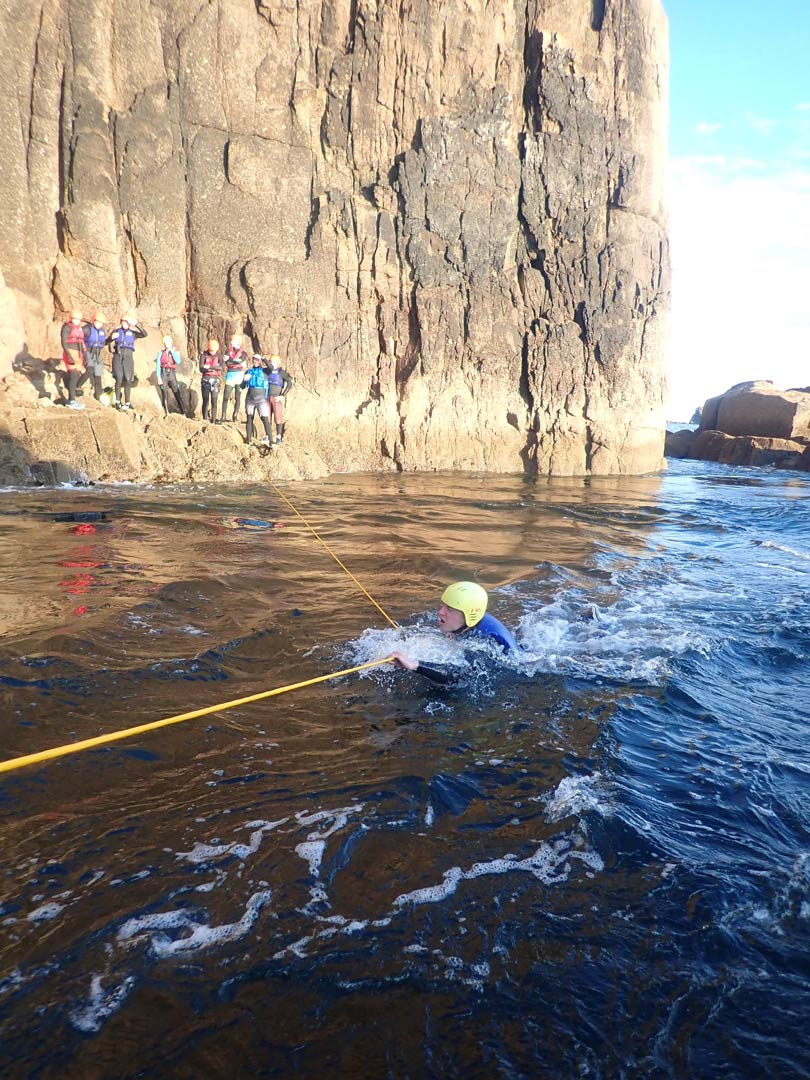
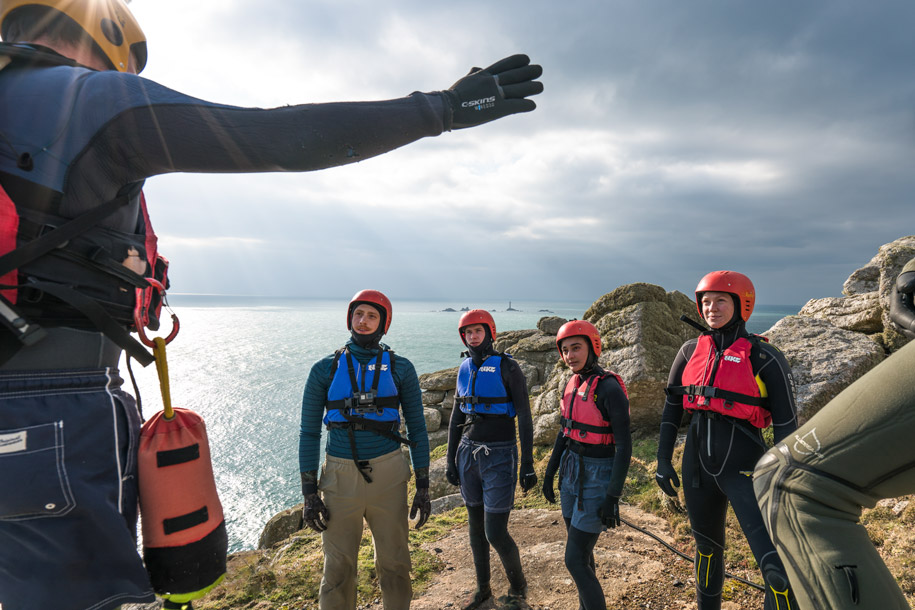
Crossing powerful tidal flows like this one at Land’s End is all part of the challenge on our Advanced Coasteering route. In this shot, a participant uses a throwline to safely traverse a fast-moving channel beneath towering granite cliffs — one of many committing features that make this our most serious and rewarding coasteering adventure.
Coasteering Accessories
Waterproof Torch
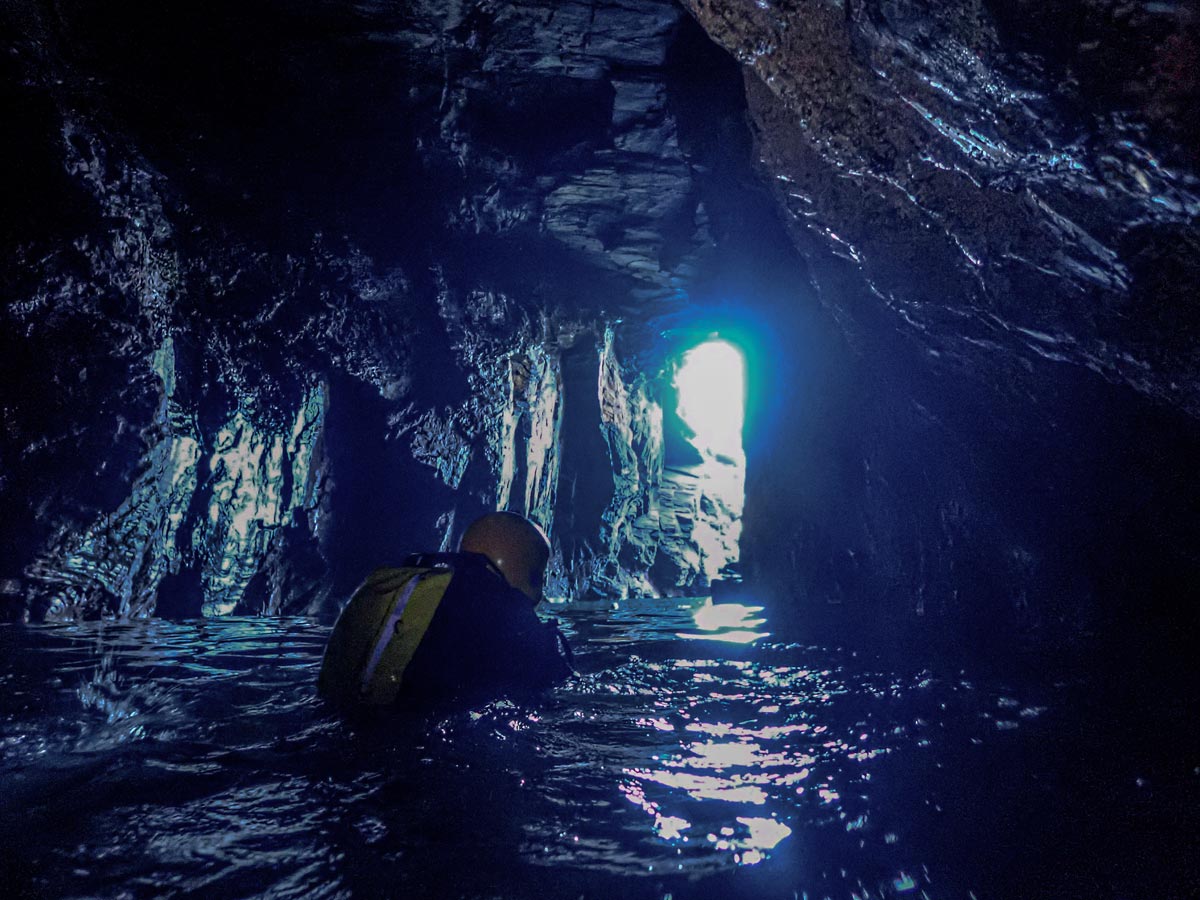
I hope you agree, that exploring sea caves is one of the most exciting and compelling elements of coasteering. These other-worldly caverns feel as out there as you can get – being jostled around by the swell in almost pitch-darkness is a very strange experience indeed.
To get any value out of the larger, deeper sea caves, where you’ll be in almost total darkness, you’re going to want to bring some additional light with you. A torch is also invaluable if your exploration goes on longer than planned and daylight starts to fade.
As ever, I present you with two choices. The first is cheap and cheerful. Generic waterproof torches are widely available. They make very exaggerated claims about the number of lumens they deliver, and they lack any additional features. However, they do the job, and for the price, they really are surprisingly good.
If you’re looking for something a ridiculously bright, I use a Fenix LR35R. It boasts a genuine 10000 lumens of light, which makes it bright enough to comfortably navigate even the darkest of spaces. If you’re filming your adventures, you need as much light as possible for any filming done inside dark sea caves. So I use this as much for my viewers as for myself (all ten of them!). Note that it does not come with a fully waterproof rating.
I spoke to a representative at Fenix about this and he said he could not vouch that it would survive full immersion. But, I use it just in the front pocket of my buoyancy aid with no additional waterproof case and thus far it has worked fine. But do bear that in mind.


Keeping the Cold at Bay When Coasteering
Read on if you’re coasteering in colder waters, or plan to coasteer throughout the year. As well as a thicker wetsuit, you’re going to want a couple of extra items to keep you warm. Yep, you guessed it, some extra neoprene on your extremities can ensure you stay snug and that your coasteering session doesn’t become a suffer fest.
Wetsuit gloves, boots, and even hats come in all shapes and sizes. A thickness of 3mm is adequate for all of these items. Choose a wetsuit sock, rather than a boot, as a boot maybe have a split toe, or in-built sole that will not work well inside a pair of trainers.
I find that 3mm is also perfect for gloves. This thickness is just warm enough, but also retains maximum dexterity so you still have some grip in order to climb and effectively use handholds as you navigate the coasteering environment.
Finally, you may want to get a wetsuit hood. Ensure that whatever helmet you’re wearing will still fit over your hood.


Wrapping Up
At this point, you’re fully equipped to tackle most self-led coasteering objectives — with the right balance of core safety gear, optional extras, and a healthy respect for the environment you’re entering.
Remember: the most important piece of equipment you carry is your own judgement. Always build experience progressively, plan conservatively, and never hesitate to turn back if conditions change.
Have fun out there — and stay safe.